


We’re continuing to cover methods for speeding up your SQL Server database backup and restore processes. There’s one rule that must apply for all these techniques – code changes must not be necessary!
If you frequently need to restore production databases into QA/Dev environments, these techniques may well prove very useful in speeding up the process.If you need some help speeding up your SQL Server backup and restore operations, please contact us or take a look at our services.
Previous posts in this series:
What is SQL Server Partitioning?
- Create new filegroups and files
- Create a Partition Function and Scheme
- Move the data to the new partitions
- This step is likely to be the most time-consuming and require the most planning. If you’re considering Partitioning, then chances are, you have large tables. In a perfect world, you would have implemented Filegroups and Partitioning when designing your database, and not once you’ve filled it with terabytes of data.
In order to speed up our backup and restore processes, we’re going to partition the Audit table based on its ‘date’ column so that the data created in historic years is stored in different Filegroups. This will ultimately allow us to configure our backups to only include the Filegroups containing the data that we want to restore.First of all, we need to create some new Filegroups:
						ALTER DATABASE [StackOverflow2010] ADD FILEGROUP [Year2018AndPrior];
GO
ALTER DATABASE [StackOverflow2010] ADD FILEGROUP [Year2019];
GO
ALTER DATABASE [StackOverflow2010] ADD FILEGROUP [Year2020];
GO
If you’re not familiar with Filegroups, read our previous blog in this series.
The code above is simply adding three new Filegroups to our database. We’ve named the Filegroups based on the partitioned data that we intend to store in them i.e. separated by year, with everything prior 2019 belonging to a single Filegroup (more on that below). Of course, you may decide to use a none-date value, such as an integer.
This leaves us with four Filegroups – the Primary Filegroup, and the three new Filegroups that we’ve just created.
Next, we need to add a new physical data file to each of the Filegroups:
					ALTER DATABASE [StackOverflow2010]
ADD FILE
 (
 NAME = [Part2018AndPrior],
 FILENAME = 'C:\Databases\StackOverflow2010\StackOverflow_2018AndPrior.ndf',
 SIZE = 3072KB,
 MAXSIZE = UNLIMITED,
 FILEGROWTH = 1024KB
 )
TO FILEGROUP [Year2018AndPrior];
GO

ALTER DATABASE [StackOverflow2010]
ADD FILE
 (
 NAME = [Part2019],
 FILENAME = 'C:\Databases\StackOverflow2010\StackOverflow_2019.ndf',
 SIZE = 3072KB,
 MAXSIZE = UNLIMITED,
 FILEGROWTH = 1024KB
 )
TO FILEGROUP [Year2019];
GO

ALTER DATABASE [StackOverflow2010]
ADD FILE
 (
 NAME = [Part2020],
 FILENAME = 'C:\Databases\StackOverflow2010\StackOverflow_2020.ndf',
 SIZE = 3072KB,
 MAXSIZE = UNLIMITED,
 FILEGROWTH = 1024KB
 )
TO FILEGROUP [Year2020];
GO
We’ve now created the necessary file structure that will support our partitioned data. The next step is to create a Partition Function. The Partition Function tells SQL Server how we want to map the data rows in our table to our partitions:
					CREATE PARTITION FUNCTION [PartitioningByYear] (DATETIME)
AS RANGE LEFT FOR VALUES
(
 '20190101',
 '20200101',
 '20210101'
);
GO
The RANGE LEFT syntax above is essentially saying “put values BEFORE 1st Jan 2019 in the first partition, put values BEFORE 1st Jan 2020 in the second partition, and put values before 1st Jan 2021 in the third partition.
Although we’ve mapped our data to our partitions using the Partition Function, we haven’t actually mapped the partitions themselves to the respective Filegroups.
To do that, we need to create a Partition Scheme:
					CREATE PARTITION SCHEME [PartitionByYear]
AS PARTITION [PartitioningByYear]
TO
(
 [Year2018AndPrior],
 [Year2019],
 [Year2020],
 [DEFAULT]
 );
GO
					CREATE TABLE [dbo].[AuditPartitioned](
    RecordId[int] NOT NULL,
    UserId INT NULL,
    [Date] [datetime] NULL,
    [Notes] NVARCHAR(1000)
) ON [PartitionByYear] ([Date]);
GO

INSERT INTO [dbo].[AuditPartitioned]
(
    [RecordId],
    [UserId],
    [Date],
    [Notes]
)
SELECT [A].[RecordId],
       [A].[UserId],
       [A].[Date],
       [A].[Notes]
FROM [dbo].[Audit] AS [A]
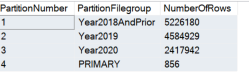
Before we go any further, let’s confirm that our data is now partitioned as we expect:
					SELECT [p].[partition_number] AS [PartitionNumber],
       [f].[name] AS [PartitionFilegroup],
       [p].[rows] AS [NumberOfRows]
FROM [sys].[partitions] AS [p]
    JOIN [sys].[destination_data_spaces] AS [dds]
        ON [p].[partition_number] = [dds].[destination_id]
    JOIN [sys].[filegroups] AS [f]
        ON [dds].[data_space_id] = [f].[data_space_id]
WHERE OBJECT_NAME([p].[object_id]) = 'AuditPartitioned';
Let’s rename the tables so our applications and scripts are interacting with our newly partitioned table rather than the old version:
					EXEC sp_rename 'dbo.Audit', '_Audit';
GO
EXEC sp_rename 'dbo.AuditPartitioned', 'Audit';
…and finally, drop the ‘old’ Audit table:
DROP TABLE [dbo].[_Audit];
Our data is now partitioned so that we can target our backups and restores to the only the data we care about. Any new rows or modified rows will be allocated to the correct partition.
In our example above, if we back up and restore only the Primary Filegroup, we’re handling only 856 rows from the Audit table, rather than the entire set:
					BACKUP DATABASE [StackOverflow2010]
FILEGROUP = 'PRIMARY'
TO  DISK = 'C:\Databases\Backups\StackOverflowPrimaryFB.bak'
WITH COPY_ONLY; /*optional*/

RESTORE DATABASE [StackOverflow2010] FILEGROUP = 'PRIMARY'
FROM DISK = 'C:\Databases\Backups\StackOverflowPrimaryFG.Bak';
We hope you find this technique useful when backing and restoring your production databases into test and development environments!
If you’re struggling to speed up your backup and restore processes and need some assistance, please contact us or take a look at our services.
Thanks for reading!
